
I am so excited to be back for a visit to I Heart Organizing, sharing some new crafting solutions for the new year.
My craft room also moonlights as my home office and a periodic guest room, so it’s essential that everything has a proper place and I can easily restore order at the end of a crafting session. As I’ve shared on previous visits, ensuring that my projects, inspiration and embellishments are well-organized is one way I make effective use of this multi-purpose space. Another essential element in optimizing function is making sure my craft paper — the supply I use more than any other — is efficiently stored and organized.

I readily admit that it took me multiple takes to find a storage solution that really worked for me. My priorities were to know what paper I had and to actually use it, as well as to be able to easily put unused paper away. I also wanted an option that did not take up a lot of space.
Initially, I kept everything stacked in a plastic storage bin, which made it very challenging for me to know what paper I had {though really easy to “need” to buy new paper…}. Then I tried an accordion-style paper sorter. The challenges with this option were that it had a very limited capacity, it was hard to organize the paper into my preferred categories and it was very difficult to get paper in and out, especially when the sorter was full. Next, I purchased some modular storage drawers specifically designed for 12X12 paper, thinking I had finally hit on the right solution. Man, was I wrong. They were poorly designed for the task: the hanging rods constantly came loose due to the weight of the paper and the lack of rollers made it very difficult to pull the drawers out. I was pretty bummed, until I landed on my current solution, which I love and which works perfectly for me: my hanging paper bin.

{My pup Brontë is a big fan of craft time!}
My starting materials for this simple yet effective solution were an Itso fabric storage bin and 12X12 hanging folders. I picked the Itso bin because the 13X13X13 size is perfect for housing 12X12 handing folders, the bin is very durable {which was important, given how much weight it would be holding} and the sturdy handles make the bins easily portable. And bonus: they store flat when not in use! Next, I purchased hanging file folders for 12X12 paper. I purchased 36 folders, because I wanted enough folders so that I could effectively categorize my paper stash and be prepared for any changes I might like to make in the future, like adding additional categories {check out the Recollections line at Michaels for folders that fit the ITSO bins}.
Admittedly, the bin and folders set me back just north of $80 {the majority on the file folders}, which is no small chunk of change. However, it’s been 6 years since I implemented this system and nary a change have I made. So that’s less than $14 a year and counting for priceless satisfaction!
However, there are definitely some DIY alternatives at your disposal. For example, the lovely Jen Jones gave us detailed instructions back in March of last year for creating amazing adorable DIY fabric bins. So all you need is the right size box and you can customize it to your style and space. And there are a number of sites out there that provide great step-by-step instructions for creating your own 12X12 folders, using office supplies you may already have on hand.
- Quotes and journaling stickers
- Vintage/distressed
- Vacation/travel
- Wedding/formal
- Baby/child
- Spring/Summer
- Fall
- Winter
- Christmas
- Other holiday
- Themed papers
- Flowered
- Striped
- Geometric/circles
- Velum
- Black & white
- Brown & cream solid
- Brown pattern
- Blue solid
- Blue pattern
- Green solid
- Green pattern
- Red solid
- Red pattern
- Pink solid
- Pink pattern
- Purple solid
- Purple pattern
- Yellow solid
- Yellow pattern
- Orange solid
- Orange pattern
I know, I know… holy categories, Batman! But I find that by sub-dividing this way, I spend a lot less time sorting through paper to find just the right one. Perhaps the best decision I made was to separate out solid from patterned paper when categorizing by color. But your categories will vary based on the types of supplies you purchase and the focus of your crafting.
Once I determined my categories, it was time to label each folder. I used my label-maker to adhere a simple label to the front of each folder.

The file folders came with plastic tabs, similar to office files, but I didn’t love the look and they made the folders a little unwieldy to flip through. Instead, I created a few section labels to “road map” my bin. Once I get to the right section, it’s quick and easy for me to flip to the right folder. The supplies I used for creating these section labels included:
- Wrapping or craft paper
- Circle punch or circle stencil
- Letter stickers or die-cut stickers

I cut out four circles, one for each of the four sections in my binder: themes, seasons, patterns and colors. Because the bin is viewable from both sides, I made both a front and a back for the label. Then I used letter stickers to add the section name to the front of each label. When I was finished creating the fronts and backs for the labels, I laminated them. You can definitely skip this step if you don’t have a laminator, but since I’m constantly reaching for paper, I wanted to make sure the labels would be durable.

I then used extra-strong adhesive to adhere the laminated front and back of the label together and then to adhere the labels to the first folder in each of the four sections. I finished the look by adding a color-coordinating brad, just to give the labels a bit of extra pizzazz.

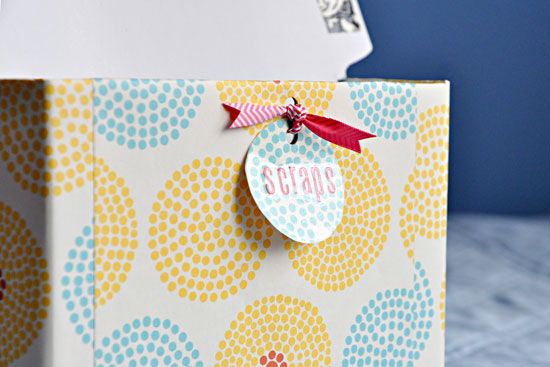
The last step was to add a cute tag to the bin, which I made using the same process as the section labels. I just added a hole and tied on a piece of ribbon. Because the bin is heavy-duty canvas, I decided not to add a hole to it. Instead, I attached the tag using a binder clip.

While my 12X12 bin has brought me six years of organized bliss, I had another paper-related challenge that required some attention: scraps. Being a thrifty crafter, I hate to throw away anything that might be useful for some future project. Don’t worry, I’m not a paper hoarder… probably… I just don’t like to waste large scraps and I like to avoid cutting down large pieces of paper for journaling spots or photo matting if possible. So any scraps I deemed “keepable” I stored in this box.

But as you can see, it’s a bit hectic and I had to flip through a lot of scraps to find one that would work. So I decided to take control of the clutter and do what I do best: categorize! First, I emptied all the scraps out of the box and sorted them.

Here are the categories I picked for my scrap box:
- Black & white
- Brown, tan & cream
- Blue
- Green
- Orange & yellow
- Pink
- Red
- Pattern
- Metallic
I didn’t use as many categories as for my 12X12 bin, since my volume of regular paper far outpaces my scraps. I just needed to make it easier to find the right scrap. Once I knew how many categories I wanted, I created section dividers.

I made the section dividers out of heavy-weight card stock, so they would easily stand up and support the weight of the scraps. I created them using my die-cut machine, but it would be easy enough to create a custom template using a manila folder you probably have lying around. I designed the section dividers so the tabs would stick over the side of the box, making it easy to find and flip to the section I want.
I opted for colored craft tape to “label” each section rather than text, which not only made creating the section dividers super quick and easy, but also makes it a snap to find the right section in the box.

Next, I gave the box itself a makeover. This step is obviously optional, but the old Crème Brule box just wasn’t doing it for me. Plus, as Ms. Jones has taught us, we are more likely to maintain a system if we love the way it looks. Once I covered the box with heavy-duty wrapping paper, I slipped the color-coded tabs into the box and added each stack of scraps to its appropriate section.

The last step was to attach a tag to my box, again using the same process as I used on my 12X12 bin above.
I must admit, I’m pretty smitten with the finished product. Not sure why I waited so long to tackle this project!

Now I have solutions for both 12X12 paper and scrap paper that will help make both crafting and clean up a snap! I’m looking forward to six more years of paper perfection.
Has anyone else tamed their paper chaos in a way that makes for much faster crafting? Or have you found a way to reimage something you already had on hand for the perfect paper storage solution?

 "My name is Sarah Eelkema and I live in a suburb of Minneapolis, MN with my husband of almost two years, Eric, and our two adorable Cavalier King Charles Spaniels, Hermes and Brontë. I am a Communications Consultant by day and by night/weekend/any spare moment, I indulge in my passion for writing, crafting and organizing. I am honored to share with all you dedicated iHeart fans my tips, tricks and secrets for organized crafting, which will not only help you get control of your craft clutter but also allow you to make more efficient and productive use of your precious crafting time. While I am blessed with an entire craft room, I promise to explain how all the solutions I share can be tailored to your specific situation, whether it be a dedicated room, a small storage space or mobile crafting. In the meantime, Happy Crafting!"


No comments:
Post a Comment