You may remember a few months back, the color we were challenged to work with was pink and the hubby and I DIY'd a portable workstation. This time around, we were challenged to play with gold! I was so game, you don't even know. I am accenting everything with gold as of late, so I knew it was the perfect time to integrate some gold into a project we had already in the works!
I don't know about you, but sometimes I have huge organizational aspirations. I gaze at my piles and come up with these grand visions of awesomeness. Then, life and budget happen and a lot of times I revert to getting crafty to organize those piles in a pretty way without breaking the bank.
That is the situation with my wrapping paper supplies. My supplies once lived in random piles and my stash would grow birthday after birthday and Christmas after Christmas. Some items were stored in my studio, some items were stored with the Christmas supplies and others were stored with party decor. I always save gift bags that we receive, and if I see them on sale, even stock up on a few extras for those last minute birthday party invites. I had messy bins that needed to be addressed. And don't get me started on pretty wrapping paper. I end up using it to line drawers and cover shoeboxes far more than wrapping gifts, but I love it and collect it and needed a much better way than this to store it....

Sure, the basket was cute, but that paper was only a quarter of my collection. And the paper continuously came unrolled and the edges were always ragged from the wire basket and improper storage method.
There are endless amazing ways to store gift wrap, such as an over the door organizer {genius idea} or under bed storage bins. I knew I had more supplies than what an over the door organizer could accommodate; I also knew I may want to remove the closet door all together someday. I also wanted to keep the wrapping supplies in my studio, which is where I work, craft, project and pretty much spend every last waking second. Lastly, I wanted to set up a station that could potentially transform into a packaging station for my shop someday, if/when I get to that point. Occasionally I ship things and keep shipping envelopes and packaging materials on hand, therefore, it only makes sense that these items live here as well. I was longing for the wrapping paper to be stored in an easy to access way, which would allow for it to stay nice and neat in-between uses. Oh! And my ribbon collection also. I had tried one of those sweet ribbon boxes, and was even planning on DIY'ing a few more, but I ultimately decided that there was a better, space saving solution.
This is the process I go through when taking on any organizing task. I sit and create a wish list and narrow down the ways to ultimately store my belongings. With all of these "wish list" items, I decided that a cabinet could do the trick. And we already had one on hand! We stole this one from the laundry room, which was previously storing linens. While cleaning out the garage this past month, I was re-acquainted with another bookcase I had purchased on Craigslist about two years ago for the boy's shared bedroom, which ultimately didn't work out. Now it will be getting a makeover and taking place of the white one in the laundry room {it makes more sense for the space size wise}. That allowed me to take our laundry room cabinet and tuck it perfectly under the stairs.

To create the gift wrap organizational portion of this project, we picked up nine inexpensive 1/2" wooden dowels from Home Depot for around $1.50 each. We also picked up a package of gold cup hooks.
My hubby found a scrap piece of wood, which he cut into 18 equal pieces. I then painted each individual piece white to match the bookcase.
I also painted the wooden dowels with an oil based liquid leaf paint, which I already had on hand, to give the dowels that pretty gold finish I was after!

Once all of the paint was dry, my hubby helped me install the hooks and dowels. The hooks were screwed into each of the eighteen pieces of scrap wood. The rest of the process went something like this:

- Measure where you wish to place your dowels which will hold your gift wrap and/or ribbon spools. My hubby did some math to ensure everything was equal and angled evenly on both sides.
- Nail the scrap wood pieces into the side of the bookcase/cabinet. We used our brad nailer.
- Here you can see how all nine pieces on one side of the bookcases looked. The opposite side was an identical mirrored image.
- The gold dowels slide and clip right into the cup hooks. They are loose enough to spin, yet tight enough to not pop out with some use.

Not a bad view right? But wait; once you walk under the stairs, the view is even better up close!

I am completely obsessed. My organizing lovin' heart couldn't be more thrilled with how well this cabinet worked out for this project!
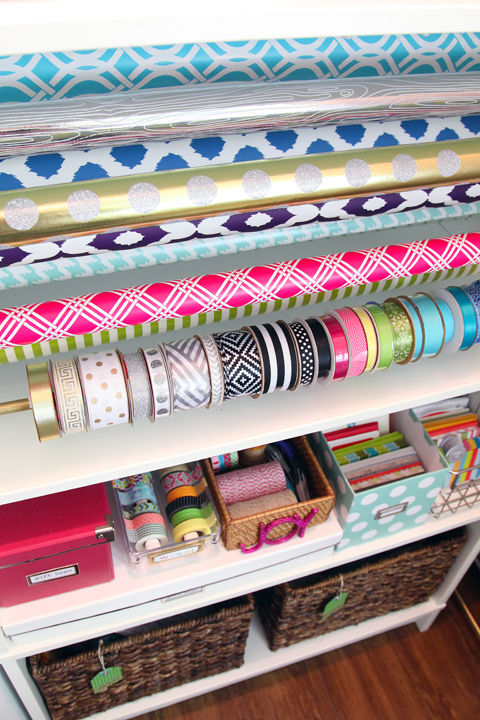
With the exception of the two baskets on the bottom shelf, a hook for my scissors and an organizer for my thread and twine, we had everything else on hand. Can you spot it all in this photo? Where's Waldo?

Let's take a closer look shall we? Sorry for photo overload.

The dowels are working great to not only hold the paper, but to easily pull the paper out to cut off a slice. The other night, I took the entire roll out to wrap a few Christmas gifts, and just popped it back in when I was done. I have a counter just outside of the closet, which is the perfect surface for wrapping. And best of all, the paper is now going to last much longer, and the edges are going to stay nice and preserved!

The dowels also spin within the hooks, making it easy to pull some ribbon from a roll.

The next shelf holds even more goodies to make giving a bit easier.


The pink box and the white box were both purchased from IKEA awhile back, and are part of the KASSETT line.
The pink box is great for holding my supply of gift tags. Tip: stock up on these after Christmas, they go on steep clearance and you get a lot for a little. I like to make my own tags throughout the year, but around the holidays when I do more wrapping at once, it is nice to have a stash to grab from.

The white box is a document or art box, which is perfect for my gift bag collection.

You will also notice that this shelf holds my recently organized Washi Tape collection.

Along with a basket of miscellaneous items, including large rolls of twine, smaller ribbon rolls and paper slicing tools.

The final two baskets are organized greeting cards, which you can read about here, and an entire basket of Thank You cards, because I still believe in hand written gratitude.

The two baskets on the bottom shelf hold more of the bulky wrap items; gift boxes in one...

... and bows and tissue in another. A few cheapy magazine holders were the perfect basket dividers for the pretties.

To label the baskets, I used some blank tags which I embellished with Washi Tape and added a clear label created with my label maker.

I was able to crawl into this sweet little space to snap a photo. This completely filled my heart with JOY, considering a month ago I didn't even know what was being stored in here. Piles and bins and years of "things", oh my!

The upper shelf has some more magazine files, these hold a few random supplies that needed a home, including store catalogs and mailing envelopes.

These little stacking boxes are one of my most favorite organizing containers. I received them from the Storage Magazine crew when they came to photograph our house last year, but have found endless uses for them.

I labeled the boxes with some white vinyl cut with my Silhouette. Simply darling!
On the back wall, we added a small hook to hold my good, gold scissors, which are not to be used for kids crafts or in the kitchen. They are all mine! Bahahahaha in my most devilish laugh!

The twine and thread holder, was originally this unfinished wooden one fro JoAnn {only $5 with a 50% off coupon}. I removed the legs and gave it a coat of brilliantly bold pink spray paint. Now, to learn how to master my sewing machine so I can put that thread to good use!

The acrylic organizer once held makeup in our bathroom, but has since been sitting in one of my piles in our utility room, waiting to be given new life. Now, it holds a few of the smaller cards and office like items that I use when writing notes or putting together a small mailing.


To add a little extra colorful whimsy to the closet, I created a fun tissue paper tassel garland using a tutorial found here. It is pinned up with push pins above the cabinet.

And that rounds out the tour! Being that it is right off of my personal creative space, I am so lucky I got to add a little glam to the project!


You can bet this area has been getting used like crazy as of late! It has been beyond convenient having every last item in one single place. Everything is easy to access and maintain, and I now know what I need to stock up on, and what sales I can skip over this year! After all of the cleaning out and purging we did last month, this feels like the best of rewards.
So that is how I integrated a little gold into my gift wrap storage project. You can see how all of the other fabulous peeps used gold within their projects, by clicking the links below:


No comments:
Post a Comment