
But let's back up a moment...
Once upon a time we built a house with under stair storage. Our basement was unfinished for many years, and under the stairs held some of our home building remnants. After we finished the space, it started to hold bins. Those bins contained our memories and were stacked all nice and neat in a row. And then I added bins of toys, and baskets, and home decor, and binders and things to donate and projects to work on and more memories.... oh my. As I added more and more {it was for sure becoming a stash and dash zone}, things were becoming more and more challenging to get to. And things started building up and piling and the entire closet became a giant chaotic embarrassing mess.
Sometimes I get so excited to dive into a project, that I start working on it before realizing I should have stopped for two seconds and taken a before photo. So, I took one of my studio right after the area under the stairs was completely empty.

Just imagine all of that, plus the same amount behind me, all stored in a not-so-neat way in the 3 1/2' x 8 3/4' storage space. Not cool. But what was cool, was having a great, blank slate to play with!

By emptying it out completely, we took advantage of the chance to finish the walls and give them a fresh coat of paint along with some pretty white trim.

Then I had to look at everything I wanted to put back into this closet, and come up with a plan to keep it tidy for the long haul.
There were two areas of the storage space I wanted to address. Being that the closet is right off of my office/craft room, it was important for me for this space to be the hub of all of my projects. Once we emptied under the stairs, we donated about 40% of the items! It was amazing. So you would think I wouldn't have all that much to put back into this space, however, I still had quite a few things that came out of our utility room and other items that never had a proper home in my office, that needed a place to call home.
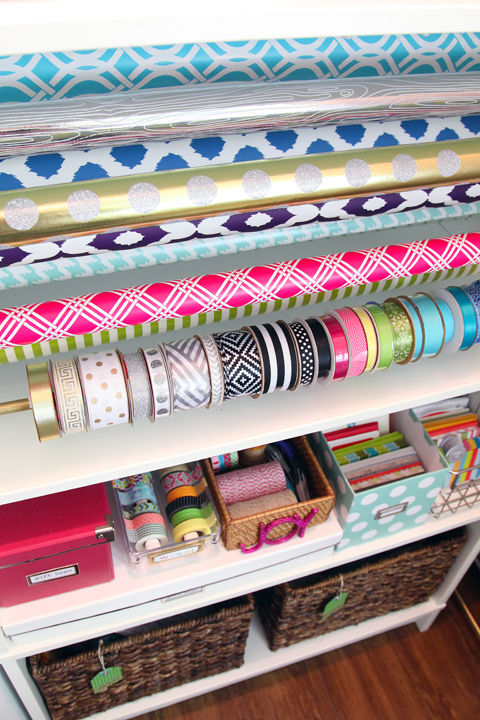
So phase one was to use an existing cabinet to turn it into a functional gift wrap/packaging station. This has been on my drool list since laying my eyes on the Martha Stewart station a few years back. Phase two was to add in a wall of drawer storage, allowing me to navigate a "hallway" to access everything being stored in the awkwardly shaped space. When items under the stairs were stacked from the back forward, I had set myself up to fail. Items in the back were lost, not simple to access, and never maintained. That created a forward motion for the rest of the closet, and eventually, I had to run for cover upon opening the door.
As I mentioned, I initially thought about splurging on the Martha Stewart cabinets and hutch to put together the primo storage space for gift wrap and boxes and bows. But the cost of the cabinet combination alone came in at $520!
For the drawer system, again, I was dreaming big. I have purchased one small set of Elfa drawers in my life {to use in my wardrobe}, and I heart them like crazy. The quality is amazing and they roll so nice and are extremely sturdy. So, I initially came up with a plan to check out the Elfa system again. I am OK in investing in good quality if it is something I think will last the life of the house. Sticker shock! $540 for the system I wanted to build out of their drawer frames and baskets. Yeah, no thank you.
So, we were resourceful, pulled a cabinet from the laundry room, and with the help of some inexpensive wooden dowels, scrap wood, paint and hooks, for around $20, I was able to create my own gift wrap station!

And for the price difference, I am pretty sure the amount of joy I had for this project is unexplainable!
IKEA makes a drawer system which is similar to the Elfa. However, it is IKEA and not Container Store, so there is a huge price difference. When I pieced together a similar setup at IKEA using the same number of frames and baskets as I initially planned with the Elfa, it came in at $184. Sold. That meant two tall frames, two short frames, 10 small baskets, 5 large baskets and three toppers. I will admit, the IKEA frames are not as sturdy and the drawers don't roll as nicely, but that is such a huge price difference for the same amount of storage! It just made the most sense to me given how the space was going to be used. To glam them up a bit, I gave them some gold spray paint lovin'.

So in the end, my dream vs. reality:
 |
| {ALGOT system from IKEA, Martha Stewart Gift Wrap Station, Elfa system from Container Store} |
You have seen the gift wrap awesomeness, now, for the remainder of the space under the stairs!

Please forgive the photography. This closet is so small that with my lens, I was having a heck of a time getting it all into one photo, and no tri-pod could be used either.

I am over the moon for the gold drawer system. I think the gold spray paint should hold up fairly well, as it had about a month of cure time while we finished the closet space. And if not, I have a small paint brush for touch-ups.
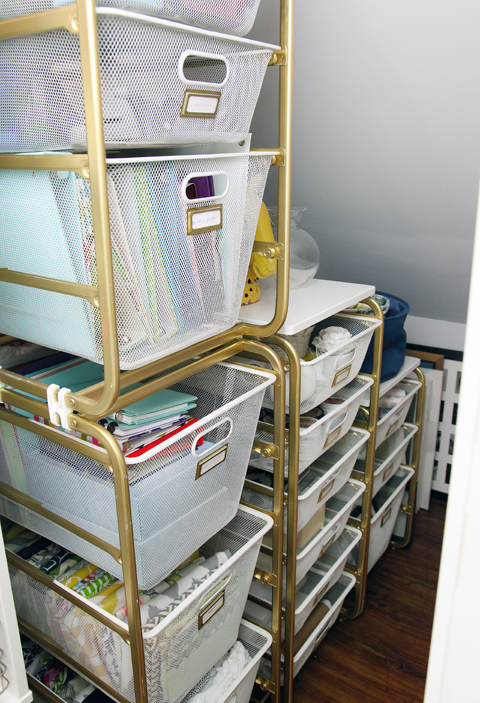
To label all of the drawer fronts, I added my favorite sticky bookplates found at Staples. There are always coupons for the Martha collection, so I pick them up whenever I can get them on sale.

I know in the photos above that it looks tight, but we measured for this project about eighteen times, certain we couldn't make it work. But it did! And I can easily walk in and access the contents of the drawers from sides because of the small "hallway".

Please forgive my awkwardness. I hate being in front of the camera, but I asked the hubby to take a few photos to show that I can easily use this tight space.


So now what do I have stored in these drawers? SO much goodness!
- Camera accessories: Lighting, lenses, camera straps, camera bag inserts, flip cam and smaller digital camera, chargers, etc... Anything camera related now lives in the top drawer.

- Planner and binder making accessories: Although I am not to a point where I have the resources and capacity to be mass producing these puppies in my Etsy shop, I do create them for locals on occasion and stock up on materials when I can get them on sale. The binders and inserts and materials take up two drawers.

- Fabric: Two drawers are dedicated to my years of fabric purchases for pillows, table runners, upholstery projects, curtain panels, etc....

The next cart holds home accessories and project materials.

- Accessories: Candle votives, vases, figurines, etc... anything that I love that I set rotate out with other accessories around our home. I am always collecting inexpensive votives and dishes from thrift stores because I love to use them for flowers, pens, paperclips, etc...
- Paint samples: I purchase these to get a custom color on small painting projects.
- Trays: Use these around the home as well as for entertaining. Mostly to corral items on a desk or dresser.
- Unfinished Projects: I am always coming up with projects for spaces we are working on, but can't always get to them right away. This drawer holds those.
- Project Life: I am planning on starting back up in 2014 with a photo per day, and use Project Life to document that.
- Artwork: We have a stash of frames from 12 years of hitting up IKEA and thrift shops, and I have been wanting to do a gallery wall for.ever. I have been saving some canvases and prints and also needed a drawer to stash frame glass and mats.
- Shelf Liner: Always lining cabinets and drawers around here, also love to use it to cover shoe boxes and cereal boxes!

- Free: This drawer is basically a drawer which can be used to expand my storage, but in the meantime, I toss my extra printer cartridge in there.
- Frames: We have a stack of large frames tucked at the end of the drawer setup. All of the smaller sized frames from over the years, now fit inside of the final drawer.

And that completes the full under the stairs closet tour!


It was so fun to play the High/Low game in this space. And it really feels like I finally am setting up my work area for success. I love having a designated place for current and planned projects, for home decor and accessories and for all of my wrapping supplies. Smitten doesn't quite describe my feelings, over-the-moon-happy-in-love starts to cover it though....
Such a wonderful feeling to have the project crossed off of the list. Although we still have a lot of work to do in the utility room and garage before calling the entire storage room overhaul complete, we are taking the rest of the year off from projecting and organizing to focus on our family.
Anyone else been high-fiving over a high/low storage solution you have implemented? How do you make the most of your under the stairs storage space?


No comments:
Post a Comment