Whether you are creating a digital file or a scrapbook page, fonts are a huge piece of any design process. I know I personally love playing with different fonts and have a select that are considered my "go to", but easily forget about the other 101 that I love as well. And if you are looking to keep a consistent theme over the course of your crafting, journaling or scrapbooking project, having a font reference will be extremely helpful. My dear contributor, Sarah, loves integrating organized systems into her scrapbooking process to ensure she is making the most of her crafting time, and I just adore her solution for managing her font collection.

Confession: I’m a font fanatic. I love to have a wide variety of fonts at my disposal when creating scrapbooking pages and cards so that I can match the style of my journaling, captions and titles to the theme of the project. Back in 2012, I visited Ms. Jones’ fabulous blog to share my ideas on organizing letter stickers, but for me fonts go well beyond stickers. I can frequently be found exploring free websites for unique new fonts and I have a ton of font cartridges for my die cutting machine. But as with any scrapbooking product or tool, I run the risk of not making full use of either my computer or die cut fonts because I can’t remember what I have. That’s why I’m so excited to share my most recent craft organization solution.
For my computer fonts, I created a Font Catalog that I keep tucked in the front of my letter binder.

This somewhat tedious but super easy project took me about an hour, a great task to complete while watching TV. I created a three-column table in Word. In the first column, I repeated the phrase “The quick brown fox jumps over the lazy dog” for each of my fonts {this phrase contains all 26 letters of the alphabet}. In the second column, I identified the font name.

Since I went through the fonts alphabetically, this was pretty easy to complete. Once I had documented all the fonts, I went down the list and filled in the third column of my table with the category for each:
- Cursive
- Script
- Serif
- Sans serif
- Theme
- Shapes
Again, this was not a super sexy step, as it involved a lot of cutting and pasting, but it was quick and well worth it: now I can flip right to the category of font I need and pick out the exact right style.

But my die cut fonts are a bit of a different animal. While I can look at them in the font booklet or on the computer, nothing compares to looking at the cut out version. But it’s a waste of time, paper and cutting blades to cut out a “test” version for each project. So I wanted a solution that would allow me to quickly and easily look through all of my fonts, be durable and easily portable. Then inspiration hit. What if I cut out one sample letter from each font {I selected A} and created my own booklet? I have to say, the finished product is even better than I expected!

The first step was obviously to cut out each of the letters. I wanted each letter to be large enough that I could see all the detail, so I sized each to be approximately 2 inches high, though the width obviously varied. Since I was using my Cricut and Gypsy, I created a new project in my Gypsy, went through each cartridge one-by-one {in alphabetical order} and added the letters to the mat. This way I could cut out my letters in a bit more of an assembly-line fashion. But this first step will vary based on what type of die cutting machine or tool you have. Once I had everything laid out the way I wanted it, I cut out the letters.


As I removed the letters from the cutting mat, l carefully stacked them in the order I cut them out. This helped me when it was time to label each letter, because I was able to refer back to my Gypsy and determine which cartridge each letter came from. Once all the letters were cut out, I needed to add adhesive so I could mount them on cardstock. Bring on the sticker maker! {I actually have the Xyron sticker-maker in three sizes – all of which get a ton of use – and this largest one did double duty on this project as a laminator}.

If you don’t have a sticker maker {though if you’re a paper crafter, I highly recommend you run out and buy one right now – some of the best money you’ll ever spend, I promise!}, you could use Mod Podge or any other adhesive; this step might just take you a bit longer.
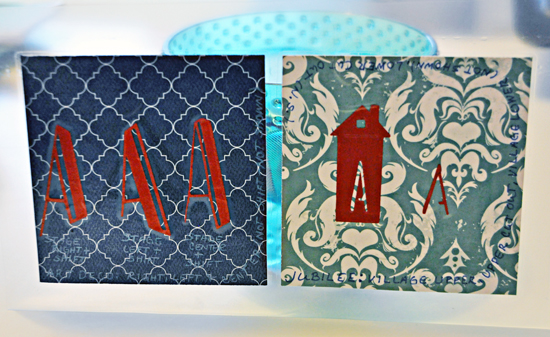
I originally planned to punch a hole in the letters themselves and string them on a ribbon, but I realized this would make it difficult to flip through the letters and much more likely that the letters would get damaged over time. So I mounted each letter on cardstock instead. I first determined the size of my cardstock mats by using the tallest and widest letters {which were not necessarily the same letter} to determine the dimensions. I decided on 4X4, which left extra room around the edge for labeling the font.
Because the booklet will hang in my craft room and be used often, I wanted to make it fun and visually interesting. I picked a deep shade of solid pink {one of the accent colors in my craft room} for the letters. I originally planned to cut the letters from patterned paper, but I realized that would make it difficult to see all the details of the letter. Instead, I used a variety of double-sided papers for matting, selecting patterns that are simple and symmetrical on both sides to avoid overwhelming the letters.

As a general rule, each sheet of cardstock got one letter on each side. However, if a particular font had a complementing shadow font, I included both. And while for most of the fonts I cut out only the uppercase A, in some cases the lowercase version was distinct enough that it needed to be included, too. To help with categorization later on, each cardstock square got similar fonts on the front and back.

As I added each letter sticker to the mat, I also labeled it, indicating the name of the Cricut cartridge as well as the specific font name and any other detail that might be helpful. I hand wrote my labels to make this step quick and easy.

Once all the letters were matted and labeled, it was time to laminate. I’ll be flipping through these frequently, so I wanted to make sure they were durable. If you don’t have a laminator or want a less expensive alternative, you could use Mod Podge to seal each one.
After laminating, I cut each mat out with my handy paper trimmer, leaving a little border of lamination around the sides to protect the edges of the paper. The final size of each measured just over 4 inches square.
Similar to my Font Catalog of Word fonts above, I wanted to categorize my die cut fonts, so I sorted my laminated cards into the following categories:
- Cursive
- Serif
- Sans Serif
- Letters in shapes
- Themed

The final step was to laminate them.

With all the font cards and dividers created, I could finally put them together. I punched a hole in the first divider card, then used it as a guide to cut holes in the font cards and remaining divider cards. Once all the holes were punched, I selected a coordinating ribbon and tied all the cards together.

I made sure to tie the ribbon securely enough to keep the cards together but loose enough that I can add new cards in the future if {okay, let’s be honest, when} I get new fonts.

I’ve even set aside some pre-cut mats and divider cards so they’re ready to go when I need more. The final step was to hang my lovely new Font Portfolio within arm’s reach on the craft cart next to my desk.

I simply attached a binder clip, left both prongs up and looped the ribbon around them.

This little beauty has already been a big help with my crafting projects and I’m definitely making better use of my fonts.

Now I’m pondering other ways I can use this idea. Hmmm… flash cards for the nieces and nephews? Do you have other ideas on how to use a cardstock booklet? Do you have a great solution for organizing your computer or die cut fonts?
 "My name is Sarah Eelkema and I live in a suburb of Minneapolis, MN with my husband of almost two years, Eric, and our two adorable Cavalier King Charles Spaniels, Hermes and Brontë. I am a Communications Consultant by day and by night/weekend/any spare moment, I indulge in my passion for writing, crafting and organizing. I am honored to share with all you dedicated iHeart fans my tips, tricks and secrets for organized crafting, which will not only help you get control of your craft clutter but also allow you to make more efficient and productive use of your precious crafting time. While I am blessed with an entire craft room, I promise to explain how all the solutions I share can be tailored to your specific situation, whether it be a dedicated room, a small storage space or mobile crafting. In the meantime, Happy Crafting!"


No comments:
Post a Comment